Subsections of

Chapter 1

Introduction

Certified Kubernetes Security Specialist (CKS) Exam Curriculum - v1.31

15% - Cluster Setup

  • Use Network security policies to restrict cluster level access
  • Use CIS benchmark to review the security configuration of Kubernetes components (etcd, kubelet, kubedns, kubeapi)
  • Properly set up Ingress objects with TLS
  • Protect node metadata and endpoints
  • Verify platform binaries before deploying

15% - Cluster Hardening

  • Use Role Based Access Controls to minimize exposure
  • Exercise caution in using service accounts e.g. disable defaults, minimize permissions on newly created ones
  • Restrict access to Kubernetes API
  • Upgrade Kubernetes to avoid vulnerabilities

10% - System Hardening

  • Minimize host OS footprint (reduce attack surface)
  • Using least-privilege identity and access management
  • Minimize external access to the network
  • Appropriately use kernel hardening tools such as AppArmor, seccomp

20% - Minimize Microservice Vulnerabilities

  • Use appropriate pod security standards
  • Manage kubernetes secrets
  • Understand and implement isolation techniques (multi-tenancy, sandboxed containers, etc.)
  • Implement Pod-to-Pod encryption using Cilium

20% - Supply Chain Security

  • Minimize base image footprint
  • Understand your supply chain (e.g. SBOM, CI/CD, artifact repositories)
  • Secure your supply chain (permitted registries, sign and validate artifacts, etc.)
  • Perform static analysis of user workloads and container images (e.g. Kubesec, KubeLinter)

20% - Monitoring, Logging and Runtime Security

  • Perform behavioral analytics to detect malicious activities
  • Detect threats within physical infrastructure, apps, networks, data, users and workloads
  • Investigate and identify phases of attack and bad actors within the environment
  • Ensure immutability of containers at runtime
  • Use Kubernetes audit logs to monitor access
Chapter 2

Lab Setup

Cluster Setup

In this session, we will explore how to setup a Kubernetes cluster with one master and one worker using VirtualBox

Pre-requisites

  • Linux Desktop with Internet
  • VirtualBox

Subsections of Lab Setup

Setting up VMs

In this chapter, we will import Ubuntu 24.04 OVA appliance to VirtualBox and will set it up.

  • Download Ubuntu OVA file
cd ~/Downloads/
curl -LO https://cloud-images.ubuntu.com/noble/current/noble-server-cloudimg-amd64.ova
  • Create a seed iso which is needed for setting initial password and login

    • Generate new SSH keys of not already done
      ssh-keygen -t ed25519 -C "${USER}@{HOSTNAME}"
    • Install cloud-utils
      sudo apt install cloud-utils
    • Create config to set at intial-boot
      cat <<EOF > my-cloud-config.yaml
      #cloud-config
      chpasswd:
        list: |
          ubuntu:ubuntu
        expire: False
      ssh_pwauth: True
      ssh_authorized_keys: 
      - $(cat ${HOME}/.ssh/id_ed25519.pub)
      EOF
    • Create seed ISO
      cloud-localds my-seed.iso my-cloud-config.yaml
  • Import OVA

    From the welcome page, click “Import”


    Select the OVA as source


    1. Click Settings
    2. Change name
    3. Increase CPU to 4
    4. Increase RAM to 4GB
    5. Click Finish

    1. Wait for import to complete
    2. Click the VM

    1. Go to settings of the VM.
    2. Add an IDE disk to Storage

    Attach the my-seed.iso to the CDROM


    Change the network settings by selecting your Wifi adapter as Bridge device for the VM and enable promiscuous mode.


  • Repeat the same steps for a worker node

  • Power-on the VMs and wait for the prompt to set new password

    • Note:- Password is “ubuntu”

  • Since you are connected to the same network where wifi is available, IP address will be set on both VMs.

    • Execute ip a on each VMs to see the IP

  • Now you can SSH into the nodes from you local system using the IP and the credentials.

  • Better setup password-less auth

    ssh-copy-id ubuntu@192.168.0.175
    ssh-copy-id ubuntu@192.168.0.149
  • Set hostnames

    sudo hostnamectl set-hostname cks-master
    sudo hostnamectl set-hostname cks-worker

Install containerd

In this chapter, we will install the container runtime

  • Install containerd

    # Add Docker's official GPG key:
    sudo apt-get update
    sudo apt-get install ca-certificates curl
    sudo install -m 0755 -d /etc/apt/keyrings
    sudo curl -fsSL https://download.docker.com/linux/ubuntu/gpg -o /etc/apt/keyrings/docker.asc
    sudo chmod a+r /etc/apt/keyrings/docker.asc
    
    # Add the repository to Apt sources:
    echo \
    "deb [arch=$(dpkg --print-architecture) signed-by=/etc/apt/keyrings/docker.asc] https://download.docker.com/linux/ubuntu \
    $(. /etc/os-release && echo "${UBUNTU_CODENAME:-$VERSION_CODENAME}") stable" | \
    sudo tee /etc/apt/sources.list.d/docker.list > /dev/null
    sudo apt-get update
    sudo apt-get install containerd.io
  • Create default containerd config file

    containerd config default | sudo tee /etc/containerd/config.toml
  • Enable Cgroup to get support for Cgroup v2

    sudo sed -i 's/SystemdCgroup = false/SystemdCgroup = true/' /etc/containerd/config.toml
  • Restart containerd

    sudo systemctl restart containerd
    sudo systemctl status containerd

    Output:-

    ● containerd.service - containerd container runtime
        Loaded: loaded (/usr/lib/systemd/system/containerd.service; enabled; preset: enabled)
        Active: active (running) since Wed 2025-02-05 21:47:38 UTC; 32s ago
        Docs: https://containerd.io
        Process: 2555 ExecStartPre=/sbin/modprobe overlay (code=exited, status=0/SUCCESS)
    Main PID: 2558 (containerd)
        Tasks: 9
        Memory: 13.6M (peak: 14.1M)
            CPU: 162ms
        CGroup: /system.slice/containerd.service
                └─2558 /usr/bin/containerd
    
    Feb 05 21:47:38 cks-master containerd[2558]: time="2025-02-05T21:47:38.695180848Z" level=info msg="Start subscribing containerd event"
    Feb 05 21:47:38 cks-master containerd[2558]: time="2025-02-05T21:47:38.695912510Z" level=info msg="Start recovering state"
    Feb 05 21:47:38 cks-master containerd[2558]: time="2025-02-05T21:47:38.696006958Z" level=info msg="Start event monitor"
    Feb 05 21:47:38 cks-master containerd[2558]: time="2025-02-05T21:47:38.696017639Z" level=info msg="Start snapshots syncer"
    Feb 05 21:47:38 cks-master containerd[2558]: time="2025-02-05T21:47:38.696025262Z" level=info msg="Start cni network conf syncer for default"
    Feb 05 21:47:38 cks-master containerd[2558]: time="2025-02-05T21:47:38.696035741Z" level=info msg="Start streaming server"
    Feb 05 21:47:38 cks-master containerd[2558]: time="2025-02-05T21:47:38.696123579Z" level=info msg=serving... address=/run/containerd/containerd.sock.ttrpc
    Feb 05 21:47:38 cks-master containerd[2558]: time="2025-02-05T21:47:38.696159432Z" level=info msg=serving... address=/run/containerd/containerd.sock
    Feb 05 21:47:38 cks-master containerd[2558]: time="2025-02-05T21:47:38.696201277Z" level=info msg="containerd successfully booted in 0.021733s"
    Feb 05 21:47:38 cks-master systemd[1]: Started containerd.service - containerd container runtime.
  • Enable packet forwarding

    # sysctl params required by setup, params persist across reboots
    cat <<EOF | sudo tee /etc/sysctl.d/k8s.conf
    net.ipv4.ip_forward = 1
    EOF
    
    # Apply sysctl params without reboot
    sudo sysctl --system 

Install and configure kubeadm and kubelet

In this chapter, we will install and configure kubeadm, kubelet and kubectl

These instructions are for Kubernetes v1.31.

  • Install curl

    sudo apt-get update
    # apt-transport-https may be a dummy package; if so, you can skip that package
    sudo apt-get install -y apt-transport-https ca-certificates curl gpg
  • Install keys needed for k8s packages

    curl -fsSL https://pkgs.k8s.io/core:/stable:/v1.31/deb/Release.key | sudo gpg --dearmor -o /etc/apt/keyrings/kubernetes-apt-keyring.gpg
  • Add the appropriate Kubernetes apt repository

    # This overwrites any existing configuration in /etc/apt/sources.list.d/kubernetes.list
    echo 'deb [signed-by=/etc/apt/keyrings/kubernetes-apt-keyring.gpg] https://pkgs.k8s.io/core:/stable:/v1.31/deb/ /' | sudo tee /etc/apt/sources.list.d/kubernetes.list
  • Update the apt package index, install kubelet, kubeadm and kubectl, and pin their version:

    sudo apt-get update
    sudo apt-get install -y kubelet kubeadm kubectl
    sudo apt-mark hold kubelet kubeadm kubectl
  • Enable kubelet

    sudo systemctl enable --now kubelet

Initialize Cluster

In this chapter, we will initialize the master node and then will add the worker to the cluster

Logon to the master node and follow along

  • Initialize kubeadm
    sudo kubeadm init --ignore-preflight-errors=NumCPU --pod-network-cidr 10.0.0.0/16
    Output:-
I0205 22:31:24.915138    4255 version.go:261] remote version is much newer: v1.32.1; falling back to: stable-1.31
[init] Using Kubernetes version: v1.31.5
[preflight] Running pre-flight checks
[preflight] Pulling images required for setting up a Kubernetes cluster
[preflight] This might take a minute or two, depending on the speed of your internet connection
[preflight] You can also perform this action beforehand using 'kubeadm config images pull'
W0205 22:31:25.854623    4255 checks.go:846] detected that the sandbox image "registry.k8s.io/pause:3.8" of the container runtime is inconsistent with that used by kubeadm.It is recommended to use "registry.k8s.io/pause:3.10" as the CRI sandbox image.
[certs] Using certificateDir folder "/etc/kubernetes/pki"
[certs] Generating "ca" certificate and key
[certs] Generating "apiserver" certificate and key
[certs] apiserver serving cert is signed for DNS names [cks-master kubernetes kubernetes.default kubernetes.default.svc kubernetes.default.svc.cluster.local] and IPs [10.96.0.1 192.168.0.175]
[certs] Generating "apiserver-kubelet-client" certificate and key
[certs] Generating "front-proxy-ca" certificate and key
[certs] Generating "front-proxy-client" certificate and key
[certs] Generating "etcd/ca" certificate and key
[certs] Generating "etcd/server" certificate and key
[certs] etcd/server serving cert is signed for DNS names [cks-master localhost] and IPs [192.168.0.175 127.0.0.1 ::1]
[certs] Generating "etcd/peer" certificate and key
[certs] etcd/peer serving cert is signed for DNS names [cks-master localhost] and IPs [192.168.0.175 127.0.0.1 ::1]
[certs] Generating "etcd/healthcheck-client" certificate and key
[certs] Generating "apiserver-etcd-client" certificate and key
[certs] Generating "sa" key and public key
[kubeconfig] Using kubeconfig folder "/etc/kubernetes"
[kubeconfig] Writing "admin.conf" kubeconfig file
[kubeconfig] Writing "super-admin.conf" kubeconfig file
[kubeconfig] Writing "kubelet.conf" kubeconfig file
[kubeconfig] Writing "controller-manager.conf" kubeconfig file
[kubeconfig] Writing "scheduler.conf" kubeconfig file
[etcd] Creating static Pod manifest for local etcd in "/etc/kubernetes/manifests"
[control-plane] Using manifest folder "/etc/kubernetes/manifests"
[control-plane] Creating static Pod manifest for "kube-apiserver"
[control-plane] Creating static Pod manifest for "kube-controller-manager"
[control-plane] Creating static Pod manifest for "kube-scheduler"
[kubelet-start] Writing kubelet environment file with flags to file "/var/lib/kubelet/kubeadm-flags.env"
[kubelet-start] Writing kubelet configuration to file "/var/lib/kubelet/config.yaml"
[kubelet-start] Starting the kubelet
[wait-control-plane] Waiting for the kubelet to boot up the control plane as static Pods from directory "/etc/kubernetes/manifests"
[kubelet-check] Waiting for a healthy kubelet at http://127.0.0.1:10248/healthz. This can take up to 4m0s
[kubelet-check] The kubelet is healthy after 1.004888923s
[api-check] Waiting for a healthy API server. This can take up to 4m0s
[api-check] The API server is healthy after 8.502467445s
[upload-config] Storing the configuration used in ConfigMap "kubeadm-config" in the "kube-system" Namespace
[kubelet] Creating a ConfigMap "kubelet-config" in namespace kube-system with the configuration for the kubelets in the cluster
[upload-certs] Skipping phase. Please see --upload-certs
[mark-control-plane] Marking the node cks-master as control-plane by adding the labels: [node-role.kubernetes.io/control-plane node.kubernetes.io/exclude-from-external-load-balancers]
[mark-control-plane] Marking the node cks-master as control-plane by adding the taints [node-role.kubernetes.io/control-plane:NoSchedule]
[bootstrap-token] Using token: zcn9eo.k3bc7xk2hoz2k37h
[bootstrap-token] Configuring bootstrap tokens, cluster-info ConfigMap, RBAC Roles
[bootstrap-token] Configured RBAC rules to allow Node Bootstrap tokens to get nodes
[bootstrap-token] Configured RBAC rules to allow Node Bootstrap tokens to post CSRs in order for nodes to get long term certificate credentials
[bootstrap-token] Configured RBAC rules to allow the csrapprover controller automatically approve CSRs from a Node Bootstrap Token
[bootstrap-token] Configured RBAC rules to allow certificate rotation for all node client certificates in the cluster
[bootstrap-token] Creating the "cluster-info" ConfigMap in the "kube-public" namespace
[kubelet-finalize] Updating "/etc/kubernetes/kubelet.conf" to point to a rotatable kubelet client certificate and key
[addons] Applied essential addon: CoreDNS
[addons] Applied essential addon: kube-proxy

Your Kubernetes control-plane has initialized successfully!

To start using your cluster, you need to run the following as a regular user:

  mkdir -p $HOME/.kube
  sudo cp -i /etc/kubernetes/admin.conf $HOME/.kube/config
  sudo chown $(id -u):$(id -g) $HOME/.kube/config

Alternatively, if you are the root user, you can run:

  export KUBECONFIG=/etc/kubernetes/admin.conf

You should now deploy a pod network to the cluster.
Run "kubectl apply -f [podnetwork].yaml" with one of the options listed at:
  https://kubernetes.io/docs/concepts/cluster-administration/addons/

Then you can join any number of worker nodes by running the following on each as root:

kubeadm join 192.168.0.175:6443 --token zcn9eo.k3bc7xk2hoz2k37h \
	--discovery-token-ca-cert-hash sha256:9a5c622b76b969b6ebe1f80ac903f738237625c7a0375a707466dbe6e724d261 
  • Now logon to the worker node and execute the join command from the output

    sudo kubeadm join 192.168.0.175:6443 --token zcn9eo.k3bc7xk2hoz2k37h \
        --discovery-token-ca-cert-hash sha256:9a5c622b76b969b6ebe1f80ac903f738237625c7a0375a707466dbe6e724d261 
  • Verify nodes

    mkdir -p $HOME/.kube
    sudo cp -i /etc/kubernetes/admin.conf $HOME/.kube/config
    sudo chown $(id -u):$(id -g) $HOME/.kube/config
    kubectl get nodes

    Output: -

    ubuntu@cks-master:~$ kubectl get nodes
    NAME         STATUS     ROLES           AGE     VERSION
    cks-master   NotReady   control-plane   2m23s   v1.31.5
    cks-worker   NotReady   <none>          90s     v1.31.5

    The nodes are in NotReady state because we didn’t install CNI.

In the next chapter, we will install Cilium CNI. Stay tuned!

Install CNI - Cilium

In this chapter, we will deploy Cilium CNI

You need to execute these steps only from master node

  • Download the cilium CLI

    CILIUM_CLI_VERSION=$(curl -s https://raw.githubusercontent.com/cilium/cilium-cli/main/stable.txt)
    CLI_ARCH=amd64
    if [ "$(uname -m)" = "aarch64" ]; then CLI_ARCH=arm64; fi
    curl -L --fail --remote-name-all https://github.com/cilium/cilium-cli/releases/download/${CILIUM_CLI_VERSION}/cilium-linux-${CLI_ARCH}.tar.gz{,.sha256sum}
    sha256sum --check cilium-linux-${CLI_ARCH}.tar.gz.sha256sum
    sudo tar xzvfC cilium-linux-${CLI_ARCH}.tar.gz /usr/local/bin
    rm cilium-linux-${CLI_ARCH}.tar.gz{,.sha256sum}
  • Deploy CNI

    cilium install --version 1.17.0
  • Check the deployment status (It may take 10-15mins depends on your internet speed)

    cilium status --wait
  • Once deployment completes the output will show all in good shape like below.

        /¯¯\
     /¯¯\__/¯¯\    Cilium:             OK
     \__/¯¯\__/    Operator:           OK
     /¯¯\__/¯¯\    Envoy DaemonSet:    OK
     \__/¯¯\__/    Hubble Relay:       disabled
        \__/       ClusterMesh:        disabled
    
    DaemonSet              cilium             Desired: 2, Ready: 2/2, Available: 2/2
    DaemonSet              cilium-envoy       Desired: 2, Ready: 2/2, Available: 2/2
    Deployment             cilium-operator    Desired: 1, Ready: 1/1, Available: 1/1
    Containers:            cilium             Running: 2
                        cilium-envoy       Running: 2
                        cilium-operator    Running: 1
    Cluster Pods:          2/2 managed by Cilium
    Helm chart version:    1.17.0
    Image versions         cilium             quay.io/cilium/cilium:v1.17.0@sha256:51f21bdd003c3975b5aaaf41bd21aee23cc08f44efaa27effc91c621bc9d8b1d: 2
                        cilium-envoy       quay.io/cilium/cilium-envoy:v1.31.5-1737535524-fe8efeb16a7d233bffd05af9ea53599340d3f18e@sha256:57a3aa6355a3223da360395e3a109802867ff635cb852aa0afe03ec7bf04e545: 2
                        cilium-operator    quay.io/cilium/operator-generic:v1.17.0@sha256:1ce5a5a287166fc70b6a5ced3990aaa442496242d1d4930b5a3125e44cccdca8: 1
  • Delete the cilium operator to cleanup transient errors that may get flagged during test

    kubectl delete pods -n kube-system -l name=cilium-operator
  • You can run a connectivity test to verify the kubernetes network health

    cilium connectivity test

    After a while, you should see below output

    ...
    ℹ️  Single-node environment detected, enabling single-node connectivity test
    ℹ️  Monitor aggregation detected, will skip some flow validation steps
    ⌛ [kubernetes] Waiting for deployment cilium-test-1/client to become ready...
    ⌛ [kubernetes] Waiting for deployment cilium-test-1/client2 to become ready...
    ⌛ [kubernetes] Waiting for deployment cilium-test-1/echo-same-node to become ready...
    ⌛ [kubernetes] Waiting for pod cilium-test-1/client-b65598b6f-n99h7 to reach DNS server on cilium-test-1/echo-same-node-5c4dc4674d-7vtmj pod...
    ⌛ [kubernetes] Waiting for pod cilium-test-1/client2-84576868b4-6xjp5 to reach DNS server on cilium-test-1/echo-same-node-5c4dc4674d-7vtmj pod...
    ⌛ [kubernetes] Waiting for pod cilium-test-1/client-b65598b6f-n99h7 to reach default/kubernetes service...
    ⌛ [kubernetes] Waiting for pod cilium-test-1/client2-84576868b4-6xjp5 to reach default/kubernetes service...
    ⌛ [kubernetes] Waiting for Service cilium-test-1/echo-same-node to become ready...
    ⌛ [kubernetes] Waiting for Service cilium-test-1/echo-same-node to be synchronized by Cilium pod kube-system/cilium-vlnmr
    ⌛ [kubernetes] Waiting for NodePort 192.168.0.175:32072 (cilium-test-1/echo-same-node) to become ready...
    ⌛ [kubernetes] Waiting for NodePort 192.168.0.149:32072 (cilium-test-1/echo-same-node) to become ready...
    ..............
    .. redacted..
    ..............
    ✅ [cilium-test-1] All 66 tests (275 actions) successful, 44 tests skipped, 1 scenarios skipped.
  • Now cluster is ready!

    ubuntu@cks-master:~$ kubectl get nodes
    NAME         STATUS   ROLES           AGE   VERSION
    cks-master   Ready    control-plane   32m   v1.31.5
    cks-worker   Ready    <none>          31m   v1.31.5
    ubuntu@cks-master:~$ 

Congratulations on setting up your cluster! Now we can start practicing our topics. See you there.

RBAC

Subsections of RBAC

Service Accounts

The basic unit in Kubernetes is a Pod. Pods runs inside a namespace. Every namespace have a default service account.

Why we need service account?

If your workload needs to access the Kubernetes API, then we need a mechanism to authenticate and authorize the request. Here we can use the service account and assign permissions to it.

This service account can then be used inside a Pod.

Every namespace have a default service account.

ubuntu@cks-master:~$ kubectl get sa
NAME      SECRETS   AGE
default   0         4d19h
ubuntu@cks-master:~$ 

Service account

kubectl create -f - <<EOF
apiVersion: v1
kind: ServiceAccount
metadata:
  name: mysvcacc
  namespace: default
EOF

Create a Pod and use this service account to contact the API

kubectl create -f - <<EOF
apiVersion: v1
kind: Pod
metadata:
  creationTimestamp: null
  labels:
    run: api-test
  name: api-test
spec:
  serviceAccountName: mysvcacc
  containers:
  - image: nginx
    name: api-test
EOF

The authentication using service account happens via a signed JWT token which gets mounted inside the Pod.

View token

kubectl exec -it api-test -- cat /run/secrets/kubernetes.io/serviceaccount/token && echo

You can visit the https://jwt.io/ to and paste the token to see the details.

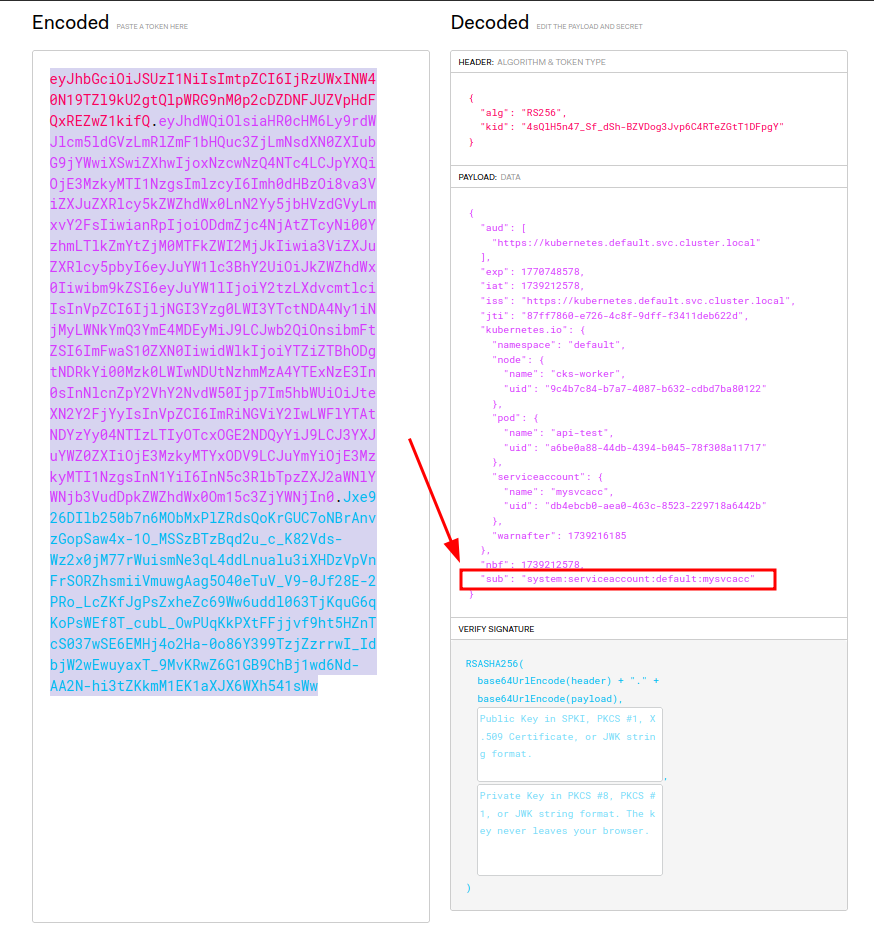
As the screenshot shows, the API service can indentify the token and handle authorization using the “sub” field.

You can control the token mount behavior using below flag.

FIELD: automountServiceAccountToken <boolean>


DESCRIPTION:
    AutomountServiceAccountToken indicates whether pods running as this service
    account should have an API token automatically mounted. Can be overridden at
    the pod level.

In which scenario you need to set automountServiceAccountToken to false.

The scenario which your workload don’t have to contact API, but need a service account.

Yes, you can use service account for another scenario where you need an imagePullSecret to pull container images.

Using imagePullSecter in ServiceAccount

kubectl create secret docker-registry myregistrykey --docker-server=<registry name> \
        --docker-username=DUMMY_USERNAME --docker-password=DUMMY_DOCKER_PASSWORD \
        --docker-email=DUMMY_DOCKER_EMAIL
kubectl patch serviceaccount mysvcacc -p '{"imagePullSecrets": [{"name": "myregistrykey"}]}'
apiVersion: v1
kind: ServiceAccount
metadata:
  creationTimestamp: 2021-07-07T22:02:39Z
  name: mysvcacc
  namespace: default
  uid: 052fb0f4-3d50-11e5-b066-42010af0d7b6
imagePullSecrets:
  - name: myregistrykey

Accessing API from Pod

curl -k  https://${KUBERNETES_SERVICE_HOST}/api -H "Authorization: Bearer $(cat /run/secrets/kubernetes.io/serviceaccount/token)"
{
  "kind": "APIVersions",
  "versions": [
    "v1"
  ],
  "serverAddressByClientCIDRs": [
    {
      "clientCIDR": "0.0.0.0/0",
      "serverAddress": "192.168.0.175:6443"
    }
  ]
}

Role and ClusterRole

The Role is for a namespace and ClusterRole is for entire cluster.

A role maps the permissions to an object.

Below role indicates get and list permissions to object Pod inside the namespace default.

kubectl create role myaccrole --verb=get --verb=list --resource=pod --dry-run=client -o yaml
apiVersion: rbac.authorization.k8s.io/v1
kind: Role
metadata:
  creationTimestamp: null
  name: myaccrole
  namespace: default
rules:
- apiGroups:
  - ""
  resources:
  - pods
  verbs:
  - get
  - list

Below ClusterRole is same as Role, but the difference here is that the ClusterRole can be assigned to many namespaces.

kubectl create clusterrole myaccrole --verb=get --verb=list --resource=pod --dry-run=client -o yaml
apiVersion: rbac.authorization.k8s.io/v1
kind: ClusterRole
metadata:
  creationTimestamp: null
  name: myaccrole
rules:
- apiGroups:
  - ""
  resources:
  - pods
  verbs:
  - get
  - list

RoleBinding and ClusterRoleBinding

To bind a role to “User”, “Group”, or “ServiceAccount”

I below example, we will give pod read/list access to service account mysvcacc

kubectl create rolebinding  mysvcacc --role=myaccrole --serviceaccount=default:mysvcacc --dry-run=client -o yaml
apiVersion: rbac.authorization.k8s.io/v1
kind: RoleBinding
metadata:
  creationTimestamp: null
  name: mysvcacc
roleRef:
  apiGroup: rbac.authorization.k8s.io
  kind: Role
  name: myaccrole
subjects:
- kind: ServiceAccount
  name: mysvcacc
  namespace: default